


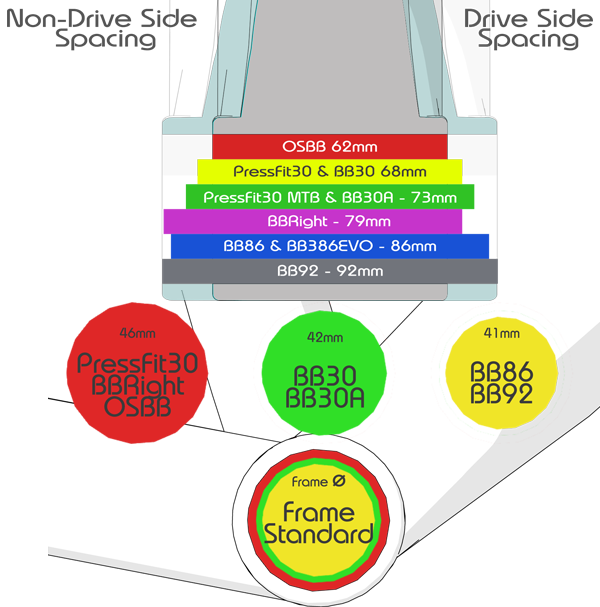
Bottom Bracket Selection Guide
You've pressed in bottom bracket after bottom bracket to make that creak go away and yet the infernal noise remains, taunting you with each pedal stroke.
It's time to hit pause for a moment.
Many of us in this position have been so laser-focused on the bottom bracket as the culprit that we've neglected to take a serious look at all the usual suspects. As many of the old timers know, the bicycle has always been the source of creaks-a-plenty, even before the advent of pressfit bb's.
So, now that you've cleaned, lubed, and reassembled that headset---with new parts as needed---and you've tightened the skewers and replaced that rocking Mavic freehub---or swapped in a wheel from a bike that doesn't make a peep---and you've taken that seatpost apart, lubed the saddle-rail contacts, and torqued the saddle into place to manufacturer's specs, you can go for a test ride...
Still creaking?
And you're sure it's from the bottom bracket area? And you've already taken the chainring bolts out, lubed them, and torqued them to spec? Good.
Now swap those Speedplays, or Times, or LOOKs, or whatever else out for some flat pedals and go for a quick ride.
Still creaking?
And you're sure it's from the bottom bracket area?
Good. If it's a creaking Shimano bike crank, you need to swap a crank over from another bike that has no creaks. Believe me, I've run into a few Shimano creaking cranks that have loosened up where the steel spindle presses into the aluminum spider/arm assembly, notably several Dura Ace 7800 cranks with umpteen-brazillian miles on them. They CAN creak. Where dissimilar metals or materials interface there will at some point be a day of separation. It is inevitable. Don't overlook it. Same goes for alloy Sram and FSA cranks, and any other bicycle crankshaft with this type of construction.
But you don't have one of these, do you? Your mountain bike's creaking crank is a Sram Red or Force carbon crank / Cannondale SiSL1 or SL2 / Rotor / Quarq or any other system with a spider-arm-splined-interface, featuring a retaining bolt or retaining ring arrangement. These bike crank systems are superbly made, modular, and therefore easy to customize, and adapt, and---from what I've seen---are the most likely to creak due to all of the above features.
Fact of Bike Life #302: Creaks are movements. Usually very small movements. Take this Cannondale SiSL1 crankarm spline (Pic 1) for instance, and this Sram carbon crank (Pic 2). The blue arrows point out the raw, shiny areas where the black anodic layer has been rubbed off. There are matching marks inside each of the chainring spiders.

This is a visual clue to something your ears already know; that movement was occurring despite the fact that the spider retaining ring or the Sram triple Torx bolt setup was as tight as James May's grip on an Arial Atom steering wheel. I know this is going to come as a shock, but the factory is supposed to assemble these with Loctite. Why wasn't it done? You'd have to ask the folks at the factory. Bottom line: Creaks are movement. Stop the movement and you fix the creak.
The following is a step by step guide to fixing a creaking bike for good. Or at least for a few thousand miles.
The bad news is that you're going to need some specialized tools, unless you've got a Sram crank, and then all you'll need is a T25. For all others you'll need the exact spider tool required...and it's not gonna be cheap. Pic 3 shows but a few. Don't bother going any further until you have the right tool in your hand.

You'll also need Loctite 609 (or equivalent), a torque wrench capable of 20-60 Nm for the retaining ring type, or a torque wrench that goes down into the 10-15 Nm range for the T25 bolt type, and common hand tools for taking the bicycle crank out and getting it back in.
You've got it all? Good.
Once you have your bicycle crank disassembled it's time to get it all clean. Scrub it up with a dishwashing detergent. Dawn is a fav. Get everything sparkling clean; crank arms, chain ring, everything, or else the entire process will be futile if the Loctite is contaminated. Now, if there was any old, crusty Loctite on the assembly, you'll need to use a dental pick to scrape away every last trace, especially from the threads. This is a good time to do an inspection. Drop the spider retaining ring on a flat surface and listen for that nice, sharp, ringing sound. If it's a dud, it's cracked. Look hard. You'll find it.
Now, use White Lighting Clean Streak or isopropyl alcohol to ensure that everything is absolutely grease and oil free. Some guys like carburetor cleaner for this, but I say steer clear as it's unnecessarily caustic. If you get it on carbon it will instantly attack the resins. Ditto for paint. Let everything air dry completely.
I like to apply the Loctite directly to the splines on the crank arm (Pic 4), and then drip some extra in for good measure (Pic 5).

Now, I can hear some howling out there about this in the Blogosphere. Some are going to say, "Cannondale says Loctite 242", or some such thing, while others are simply going to kvetch about the existence of Loctite on planet Earth.
To the first; I know they say 242, but I can tell you from experience that 242 will loosen up after the first cold snap. 609 won't. And it'll all come apart when you want it to. 609 isn't permanent. I really do sincerely applaud anyone who follows instructions. You're a rare breed indeed, so I don't want to seem flippant about disregarding a factory specified process. I'm just saying that 609 is better for this, but if you're afraid of deviating, use the 242. It will be better than nothing.
As for you Loctitophobes out there: Loctite is your friend. It isn't a crutch, a go-to solution for bad engineering. Try it. You'll like it.
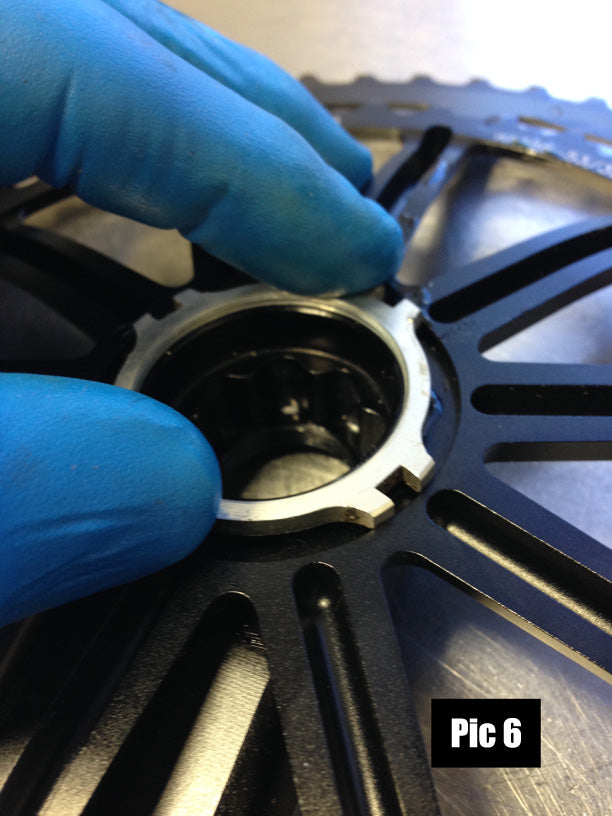
Back to our show: Now just thread the ring on (Pic 6), or thread the bolts in, and set your torque wrench accordingly.
Apply the correct torque to all fasteners (Pic 7).

Voila. Done. You can put it back in the bike or set it aside. Either way, you need to wait a few hours to ensure the Loctite has time to cure. I like 12-24 hours, but the constraints of shop life often dictate something short of that. I suggest starting a project like this first thing in the morning and test ride it later that afternoon.
You'll notice that I was not specific about torque values. That's because the values are all over the map. Obtain the torque values specific to your bicycle crankset from the component manufacturer and do not deviate.
Have fun.
Comments will be approved before showing up.
Mike Bailey
June 09, 2017
My favorite source of creaking is my Durace 11 speed clusters. I always use a water proof grease on the spindle and between all mating surface of the various fiber cog carriers and metal cogs. Recently a mechanic returned the wheel to me with the aforementioned parts free of grease and it took me a few days to realize where this “new” noise was coming from. A quick application of grease and silence again. Lordy, I love the silence.